Showing posts with label Free Patterns. Show all posts

Monday, July 27, 2009

Baby Leg Warmers - Free Pattern


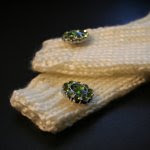
I recently decided that I wanted to teach some of my friends how to knit so that in the future I have knitting buddies. In a few weeks we are going to get together and do some small beginner projects. One of my friends has an adorable baby girl and wants to knit her a pair of leg warmers; so I wrote and tested a VERY simple pattern for her to try. I made my test pair in a solid color but the pattern is designed for stripes. If you are looking for a super easy fast pattern this is the project for you!

Random thoughts: One of the comments on this post asked a hilariously good question (why in the heck would a baby need leg warmers?!?). I actually just learned the answer about 1 month ago at a baby shower I was at. Apparently it is much easier to change a baby that is just in a onesie and leg warmers so that you don't have to deal with taking pants on a off - I wish someone had told me that when my son was still in the potty 15 times a day mode...

If you would like a PDF copy of this pattern please just send me your email addressed and I would be happy to email you a copy.


Finished Measurements
Length: 7 inches
Width: 3 inches at the top and 2 inches at the bottom

Supplies
- 1 set of 24" circular needles size US 8 (longer circular needles can be used)
- Yarn Needle
- Two buttons or Ribbon for embellishment (Optional)
- Sewing Needle (if using buttons)
- Sewing Thread (if using buttons)

Yarn
Bernat Satin
(100% Acrylic; 163 yards / 3.5 oz / 100 grams)
Color: Silk (If you are knitting stripes you will need multiple colors)
Used about 1/4 or less of a skein (this would be a perfect scrap yarn project)

Gauge
18 sts and 24 rows = 4" in Stockinette stitch


Pattern
Cast on 22 sts
Join in round using the Magic Loop Method (11 sts on each needle)

Bottom Cuff:
[k1, p1] across row and repeat until the cuff measures 1 inch

Body:
R1: k1 across
R2: (Change color here if using stripes) m1, k1 to end of 1st needle (to the Magic Loop break), m1, k1 to end of 2nd needle (to the end of the row)
R3 - 7: k1 across
R8 - 13: Repeat rows 2 - 7 (Change color before knitting row 8 if using stripes)
R14 - 19: Repeat rows 2 - 7 (Change color before knitting row 14 if using stripes)
R20 - 25: Repeat rows 2 - 7 (Change color before knitting row 20 if using stripes)
R26: Repeat row 2 (Change color before knitting the row if using stripes)
R27: k1 across

Top Cuff:
[k1, p1] across row and repeat until the cuff measures 1.5 inches

Finishing:
Bind off VERY loosely (using larger needles if needed)
Weave in ends and wet block
Add any desired embellishments such as buttons, woven in ribbons, etc.


Thursday, July 16, 2009

Twilight Hat - Free Pattern


I am a huge Twilight fan and I recently knitted myself a pair of “Bella’s Mittens” using Subliminal Rabbit’s pattern. I love the mittens and I want a pair in every color. Of course I decided that I needed a hat to match my new mittens so here is the pattern for the simple hat that I made. I loved the chunky earthy feel of the yarn in combination with the flirty fun crystal buttons. I hope you enjoy this project too!

If you would like a PDF copy of this pattern please just send me your email address and I would be happy to email you a copy.


Finished Measurements
Height: 7.5 inches
Width: 11 inches

Supplies
- 1 set 24” circular needles size US 8
- 1 set size US 8 double-pointed needles
- Stitch markers
- Yarn Needle
- 2 buttons (5/8 inches)
- Sewing Needle
- Sewing Thread

Yarn
Lion Brand Yarn
Wool-Ease Chunky
(80% Acrylic / 20% Wool; 153 yards / 5 oz / 140 grams)
152 Charcoal
About 1/2 a skein

Gauge
16 sts and 20 rows = 4” in Stockinette stitch


Pattern
Cast on 106 sts to the circular needles
R1 - 3: (Knit flat, do not join in round) [k1, p1] across the entire row
R4: k1, p1, k1, yo, k2tog, p1, [k1, p1] until the end of the row
R5 - 7: [k1, p1] across the entire row
R8: k1, p1, k1, yo, k2tog, p1, [k1, p1] until the end of the row
R9 - 11: [k1, p1] across the entire row
R12: Bind off 10 sts (96 sts remaining) k1 until the end of the row
R13: Join in round, k1 across entire row
R14: k1 across entire row
R15: [k2tog, k10] x 8 (88 sts remaining)
R16 - 18: k1 across entire row
R19: [k2tog, k9] x 8 (80 sts remaining)
R20 - 21: k1 across entire row
R22: [k2tog, k8] x 8 (72 sts remaining)
R23 - 24: k1 across entire row
R25: [k2tog, k7] x 8 (64 sts remaining)
R26 - 27: k1 across entire row
R28: [k2tog, k6] x 8 (56 sts remaining)
R29: Knit this row onto the DPNs; 14 sts per needle; k1 across entire row
R30: k1 across entire row
R31: [k2tog, k5] x 8 (48 sts remaining)
R32 - 33: k1 across entire row
R34: [k2tog, k4] x 8 (40 sts remaining)
R35 - 36: k1 across entire row
R37: [k2tog, k3] x 8 (32 sts remaining)
R38: k1 across entire row
R39: [k2tog, k2] x 8 (24 sts remaining)
R40: [k2tog, k1] x 8 (16 sts remaining)
R41: k2tog across entire row (8 sts remaining)
R42: k2tog across entire row (4 sts remaining)
Cut the thread leaving a 6” tail and thread it through the remaining 4 sts. Cinch, tie off, and weave in end. Using the other loose end, whip stitch the open edge of the brim to the hat where the hat is joined in round (closing the brim into a loop but leaving the button flap open). Sew on the two buttons and slip them through the yo holes. Wet block and you’re finished!